|
Free 14-Day Evaluations Product Downloads Sign in 
|
| Home >> Documentation >> TinyTERM ITX 3270 for iPad >> Creating and Editing Macros |
Creating and Using MacrosTinyTERM ITX 3270 for iPad has the capability to record macros. This allows you to save a series of steps and play them back at any time. Macros can also include placeholders for username and password, so that different logins can be run from a single macro. Secure text can be added as well, to protect it from being read in the clear. Creating a Macro
Tap the Record Macro button. The Macro button turns red and changes to read Recording:
At this point everything sent to the host is recorded in the macro: text, PF and other special keys, even screen taps to move the cursor. TinyTERM also recognizes screen changes from the host, and automatically configures the macro to match them. Entering Secure Text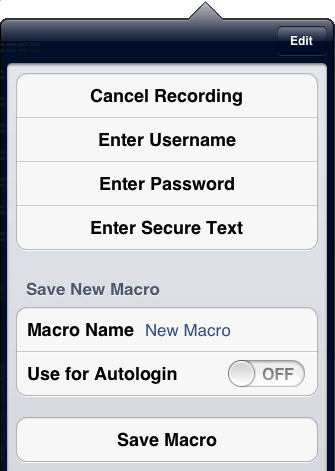
While recording a macro, tapping the Macro button brings up an Edit menu. This is not recorded as part of the macro. Cancel Recording will stop the recording in progress without saving the macro. Or you can choose the Enter Username or Enter Password option. This will add a placeholder to the macro. When the macro runs, the username or password from the connection settings will be inserted automatically at this point. This allows a single macro to serve as a login macro for multiple configurations, provided they all go through the same screens during the login process. The Enter Secure Text button opens a separate dialog that allows you to enter masked text. Secure text can't be read by looking at the configuration or macro, or by reading the screen as the macro plays back. Once you've chosen any of the three Enter buttons, or chosen not to use any of the buttons at all, tapping the screen outside the edit menu returns you to the active TinyTERM session. This screen tap is not recorded as part of the macro. Saving a MacroTo finish recording and save the macro, enter a Macro Name or accept the default. Then tap the Save Macro button. If the Use for Autologin switch is on, this macro will also be set as the Autologin Macro in the connection settings. The Autologin switch will be turned on as well. How Macros WorkMacros record not only keystrokes and cursor positioning screen taps, they also record the position and length of unprotected fields. This is done on a full screen by full screen basis. The recorded information is used to match screens and proceed with the next transmitted data. If the position or length of a field changes, the screen is different, so the macro will not continue. Macros do not include actual screen content other than field information. The nature of 3270 screens may mean that screen contents come in different order, or in different blocks of data. Screen content is an unreliable method for macro timing. This is all true for the initial release of TinyTERM ITX 3270 for iPad. Future releases will allow the user to specify screen regions to compare, rather than basing on full screens only. Running an Existing MacroTo run a macro, tap the Macro button while the session is connected. The macro menu comes up as before, with a list of Recorded Macros. Select the macro you want to run. The macro dialog comes up: 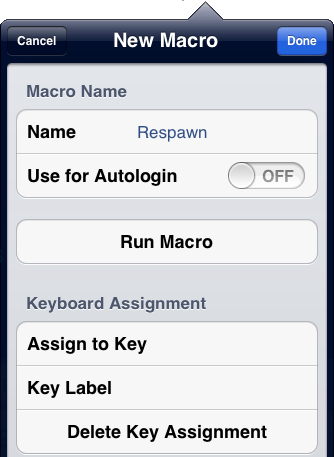
From here you can use the Run Macro button, which will also close this menu and return to the TinyTERM session. The Macro button will turn green and change to read Playing:
The button will revert to the Macro label when the macro finishes. This change also happens while an autologin macro runs. You can rename the macro by tapping the Name field to edit it. You can also turn on or off the Use for Autologin option, which will affect only the current configuration. Once you're done making changes, you can tap Cancel to return to TinyTERM without saving the changes. Or tap Done for the changes to take effect immediately. Keyboard AssignmentTouching the Assign to Key button brings up an image of the current keyboard layout. This allows you to select a key that will run the macro. After selecting the key, enter a Key Label. The selected key will change to display that label. When a macro is run from the key, the Macro button will change to Playing, just as it does for macros run manually or at autologin. Note that multiple macros can be assigned to a single key this way. But only the first assigned will be used. In that case, Delete Key Assignment removes only one association. If it was the first, the next assigned will become the primary macro for that key. Deleting a Macro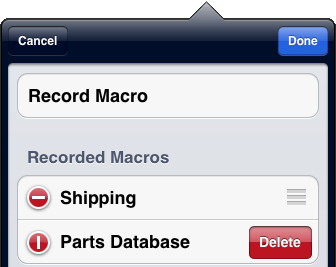
To delete a macro, tap the Macro button to bring up the menu. Tap the Edit button. This puts a red circle with white dash by each recorded macro name. Touch the button – which will rotate to vertical – to bring up the Delete button. When finished deleting macros, touch the Done button to go back to the main macro menu. In Edit mode you can also use the reorder bar control on the right of the macro names to organize macros. |
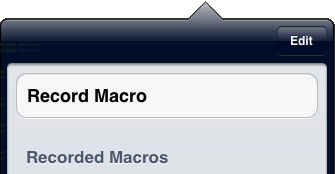
 To get started, connect to a host. At the point you want to start recording, tap the
Macro button in TinyTERM's title bar. The Macro dialog opens:
To get started, connect to a host. At the point you want to start recording, tap the
Macro button in TinyTERM's title bar. The Macro dialog opens:

| ||||||